Showing posts with label DIY. Show all posts

Wednesday, January 1, 2014

top 5 of 2013 - part 3: goals for the new year

Top 5 of 2013 - An Annual Blog Series 


Today's Top 5 of 2013 is Goals for the New Year, and what would be a more appropriate day to post it than today?  I've come so far in my sewing skills in 2013, but still have more I can learn!

#1 - Pants

This means real, wearable-outside-of-the-house pants. Not pajama pants. Leggings would be great to make, but the goal is actual pants. I attempted McCalls 6707 last February.... which ended in a ball of fabric and pins in my sewing drawer.  Gillian of Crafting a Rainbow suggested I try pants from the Austrailian pattern company styleARC. Gillian has made a lot of great versions of the Elle pant (check her makes out!), so I'm leaning towards that pattern for my 2014 pants goal, and may even splurge for the shipping on the suggested Stretch Bengaline fabric.

Stylish slim line stretch woven pant elastic waist pant
http://www.stylearc.com.au/stylearc/index.php?page=shop.product_details&flypage=flypage.tpl&product_id=404&category_id=2&keyword=elle&option=com_virtuemart&Itemid=42
stretch bengaline fabric in black
http://www.stylearc.com.au/stylearc/index.php?page=shop.product_details&category_id=31&flypage=flypage.tpl&product_id=587&option=com_virtuemart&Itemid=47
#2 - Swimsuit

I've made a bikini a number of years ago using Kwik Sew 3330. I love the flirty mid-rise bottoms... but alas, I'm not quite comfortable in a bikini at the moment. 
K3330
I loved seeing everyone's Bombshell Swimsuit by Closet Case Files, but prefer a more traditional bottom so I'm making a Bombshell-inspired tankini! I'd planned on making this last summer, and already have the fabric and made a mock-up of the top using Kwik Sew 3761. This year, it's so happening!
K3761

#3 - Underwear

I've attempted the free pattern from So Zo.. What do you know?, with not yet great success. But what I really want to make are The Ginger Body Suit and Separates by Ohhh Lulu. I need some fabulous foundations for my 2014 makes!
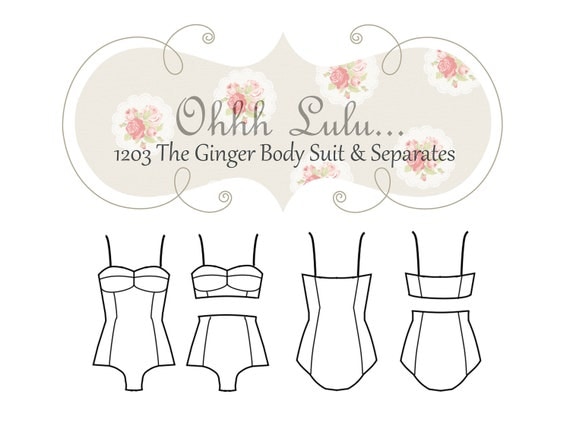
Ohhh Lulu The Ginger Body Suit and Separates PDF Sewing Pattern

#4 - Coat/Jacket

I have yet to decided what pattern to make, but I WILL be making a coat or jack for Winter 2014/2015. (Want some inspiration? Check out this awesome tailored coat by Male Pattern Boldness.)

#5 - While I'd love to use my last goal for making an amazing Sewaholic Cambie Dress (which I WILL make, and I have a feeling will become my new go-to dress pattern), I instead want to use this spot to make a goal to teach. I have had a few folks that have expressed interest in learning, and I know I am a great teacher, so in 2014 I'm going to be offering some informal 1-on-1 sewing lessons. I'm really excited about this possibility (and at the very least it will encourage me to keep my sewing room fairly neat)!

So.. what are some of your 2014 goals? 

Friday, November 15, 2013

a simple infinity scarf on the serger

This project is super quick, and a big style impact! I had to share it with you! I had a long, narrow (8'-10") strip leftover from another project (I think it's what I had to cup off to shorten a summer maxi-skirt). It's a  lightweight, woven fabric with a great pattern. All I did was finished the long, raw edges on the serger, then sew the short ends together (also on the serger). VOILA! Instant awesome accessory!


You could make one this simple, too! Choose a fabric that looks good on the reverse side, too, as both sides will show when you wear it. If you don't have a serger, you could use a jersey fabric and skip sewing up the long, unfinished edges all together. The jersey shouldn't unravel, plus it will tend to roll and cover up the raw edge anyway.

Thursday, October 10, 2013

what do you do with your scraps?

Something that bugs me about the sewing process is the amount of trash it makes. My rabbit likes to play with cut up pieces of pattern tissue, and I try to save larger pieces of fabric scraps that can be used for other projects, but what about the teeny weeny fabric pieces?

Awww, Maggie May! What a good girl!

A few months ago I splurged on myself a purchased a book to help address that issue: How to Make Stuffed Animals by Sian Keegan. (And if you don't want to make one yourself, she sells wicked cute pre-made stuffed animals from her book!)


So I thought I'd give it a try! The book comes with all the patterns in the back, all you need to do is photocopy them at 200%. Well, I didn't have a photocopier handy so I just traced them out of the book and made a hand-stitched TEENY WEENY bunny!


The stitching isn't great on this prototype little guy, but I still think he's pretty cute! I'll for sure be making more, and probably finding the time to source out a photocopier so the tiny pieces are easier to work with. 

So, what do you do with your scraps?


Wednesday, October 9, 2013

a music-themed thank you gift

Once I got my new serger up and running I thought, "why not use it to make my mom a thank you gift?" She gave me some of this very cool music-themed tapestry fabric that just needed to be a fold-over tote bag.


I used a tutorial by Make It Handmade, the same one that I used for my pleather purse, this time making the size closer to the original tutorial and adding the tote handles. One modification I did, which I learned from my pleather purse project, was to measure and cut the top taper before sewing up any of the seams. This time I also stopped the taper two inches from the top of the bag, so that the top hem would lay smoothly and not pucker or require any easing. My pattern piece looked something like this:
Tapestry fabric is thick, and can fray easily, so my new serger really shined on this project! I did all my seams on it, so I didn't have to have any bulky french seams or add lining, and serged the raw edge on the top of the bag, allowing me to just fold over once to hem, reducing bulk there. I top-stitched with my regular machine, as well as constructed the handles and strap on my regular machine with a black, bottom-wight cotton/poly fabric, because again, the tapestry would have been too bulky. I also think the sleek, black trim is a better design choice than using just the tapestry fabric, and looks pretty sharp! 


Tuesday, October 8, 2013

look what i got!

There has been a lot of stash-busting and purging on the sewing blog-o-sphere lately. And for my part, I've been doing really well at only buying new fabric for a specific project that I am at that very moment working on, and then only buying exactly what I need, instead of purchasing yards of fabric because it's on sale or pretty or I might use it for x project down the line. I even now have all my fabric in my sewing room displayed on open shelves, so I can see what I have and use that fabric first.

...and then this happened:


You can't tell by the picture, but that bag is pretty huge (and there is another 1/2 full box). But this time IT WAS FREE. I couldn't resist.

In the same week I had a friend who was moving and downsizing AND my mother was culling her stash. They invited me to come look and take what I wanted. To be fair, I really was selective on my choices, and already have two projects in the works from some of that haul. Yeah, I have a fabric problem... but looking at how much fabric I left behind at my parent's house... we know where I get it from.

But that's not even the exciting part! I also came home with this:


A serger (over-locker)! My mom upgraded hers and offered me this one a number of months back, but with all the moving and my level of sewing ability, I just wasn't ready for it yet. Now I've got it up and running in my new sewing room and I think it's going to be a really helpful tool for times when I want a finished seam but don't want to or I am not able to go through the process of a french seam or binding. Expect some new serged projects soon!

Monday, October 7, 2013

a quick knit

No, no, you haven't stumbled onto a different blog! I occasionally knit, and not terribly well. The most complicated thing I ever knitted was a mitten. That's right, ONE mitten. But knit 1, purl 1, yeah I can do that. Especially when using a quick-to-knit chunky yarn!


As you might remember, I'm really into mustard yellow for fall. I love how the introduction of just one new piece in a new color can transform all your basic outfits into a whole different season. Recently I've  pinned a lot of looks with cozy infinity scarves. They are kinda trendy right now, but also kinda ingenious as you don't have to keep fiddling with you scarf to keep it wrapped up right.  I picked up one ball (skein? package? what's the technical word for it?) of chunky Lion Brand Yarn (I've used them before and are always pleased with my results) and set of large size 13 knitting needles at the Joann Fabrics. I think the all together the cost was under $6. Not a bad investment to try out a trend.

I did a rib knit (k1 p1), 12 stitches wide. After I got going on it I realizes that 1.) it was too wide and would be way too chunky to wrap around the neck twice and 2.) I wouldn't have enough yarn to make it long enough to wrap around twice anyway. So I knitted until it was long enough to wrap loosely once around, then finished the edges and whip-stitched the ends together to close the loop. I finished the whole thing in one lazy Sunday morning watching t.v. on the couch with Mr. Sew Rachel, and eating way too many popovers (Mmm). That's my kind of knitting project. 

So it's really more of a cowl, but a slouchy cowl that gives the illusion of an infinity scarf. Next time I'll only do 8 stitches wide so I can actually wrap it around a couple times, and there will so be a next time! I already love this thing and was a red one and a black one, AND my sister in Philadelphia totally crocheted me a super nice grey one! It's in the mail as we speak and I promise to show you all when it gets here!


Wednesday, September 25, 2013

i'm a cover girl (in my made-by-me dress)!

LOOK WHAT CAME IN THE MAIL TODAY!!! 

MY MADE-BY-ME RECEPTION DRESS made THE COVER a magazine! Not even a sewing magazine! A plain old wedding magazine! So flippin' cool. You want to see inside?

In case the cover wasn't cool enough, here we are with the letter from the editor.

My bouquet featured in "INSPIRATION: FLOWERS."

I love this picture of my bouquet (made my my mother-in-law), against my parent's old barn door, photographed by the super talented Andrew Davis Photography.

And that's all before you even get to our "love story" article! I love the title Debra Bell of MarryME Magazine chose:


I've got to send a little "thank you" out for Andrew for recommending us, and Debra for her work putting this togeher, and giving us this really fun way to look back at our wedding now that we've just celebrated our first anniversary. I hope you had fun seeing it, too!


Sunday, September 22, 2013

a yellow, linen, picnic blanket skirt!

First off, CHECK OUT MY NEW BLOG BADGE! ------------->

And second, I made Tilly and the Button's Picnic Blanket Skirt!


I'd been pining after a mustard yellow skirt for a couple seasons (even though yellow is usually NOT my color), pinned some inspiration photos on pinterest.com, then spied some yellow linen on sale at Joann's a few months back and took the plunge! I originally planned on making a pleated, paper-bag waist skirt using the Adventures in Dressmaking tutorial, but eventually concluded that a paper-bag waist may not quite be the most flattering look for me. I'd been wearing my Gertie Gathered Skirt a lot, so decided to try Tilly's skirt which had a similar silhouette.


I made only a few changes from Tilly's design. Her's calls for cutting one rectangle for the skirt back, and two rectangles for the front, once stitched becoming a long piece roughly 2.1x your hip measurement. I had two yards of fabric, and my hips measurement is 38", so I decided instead to cut just my fabric lengthwise for the entire skirt piece putting me at just under Tilly's recommended measurement BUT a seamless piece. That did mean I had to omit the side pockets since there were no longer side seams. In retrospect, I wish I had dealt with the extra two seams to have had those pockets.

I also didn't include the interfacing in the waistband, but not on purpose! As I was moving along I thought to myself, "weird how she doesn't put interfacing in the waistband..." Actually, she does tell you to do that in an earlier step that I obviously wasn't paying enough attention too! It's totally wearable (I've already worn it on more than one occasion in fact!), but it would lay a lot nicer with the interfacing.


Another thing I will do differently in the future involves the placement of the buttons. I put the first one on the waistband then  the rest evenly 3" apart, but the skirt likes to pull apart that section where the waistband meets the skirt. Interfacing may have helped with that as well, but in the future I will start with the waistband button, then a button directly below the waistband AND THEN start with spacing them 3" apart.

On the plus, the linen was lovely to work with! It held a nice crease when creating the plackets, and it was just nice to work with a simple woven again. Remember how I needed to re-learn to use the automatic buttonhole foot on my mom's (now mine) machine? It turns out most of the feet she gave me don't actually go with the machine, including the buttonhole foot! I know it had a buttonhole foot so next time I'm there I will search for it, but in the mean time I FREE-HANDED THE BUTTON HOLES AND THEY CAME OUT AWESOME! (Can you tell I'm a little proud?)

 And topped it all off with lovely brass buttons. :)

Lastly, here is my mother-in-law's cat that kept photo-bombing my photo shoot. Until later!

Sunday, September 15, 2013

our first home improvement project - a little sewing diversion

You all know by now that we've just moved into our first house (yay!), and part of why we chose this house is that it didn't need much work done to it (yay!). BUT just because it doesn't need and work mean there's not things we want to change.  So before you continue on here is fair warning that there is no sewing in this post. If you read this blog just for sewing feel free to skip this read, no feelings hurt. But if you want to take a peak into my new house and what I've been doing to make it my own, read on!

BEFORE:


Here is our bathroom, renovated recently by the previous owner. I'm sure that when he picked out that sink he thought "the buyers are going to love this!" In a different bathroom it would be a great sink. But as the only sink in the only bathroom in the house, it just wasn't cutting it. Without an under-sink cupboard there is no storage in the bathroom, the little side piece of glass is the only surface for soap or your toothbrush right next to the toilet, the clear glass basin showed every spot and speck, and when you turned on the water it shot out of the bowl and kit you in the stomach! Not good. Also notice the toilet paper on the back of the toilet; no TP holder.

AFTER:

Much better! We got the simple black vanity and white porcelain basin on sale for $99, installed it ourselves (in only 5 easy trips to the hardware store... hey, we haven't done this before!), had to purchase and install a smaller mirror to fit, put up a towel bar and some art (that we purchased on our 1-year anniversary get-away last month), and  bought a matching free-standing TP holder.


We also painted the walls grey to match the tile in the bathtub surround (a good choice on the previous owner's part) and installed a little matching hook to hang your towel on while in the shower! I love how it all came out and am so proud of our first project! Thanks for letting me show it off! As a reward for all you awesome readers, here is a picture of one of my house rabbits, Miss Maggie May Bunny!


Sunday, September 8, 2013

sewing at grammah's

Well it's been a very busy month full of changes! We are in our new house (our first house!), my brother's wedding went off perfectly, and I'm starting on a new adventure career-wise which means this is my last week at my workplace of the last 4.5 years. Needless to say, I've been busy! BUT before I continue I'd like to say a little "thank you" to Zoe of "So, Zo... What do you know?" for her aptly timed post on Monday titled "Sorry But No More Apologies."

So... on to the SEWING!

While we were living out of boxes in my Grandparent's basement for the three weeks before we closed on the house, I was able to set up a little sewing space in the corner of my grandmother's office! I saved out a few supplies for some specific projects, and actually got 2.5 pieces made during that short
time!

My little temporary sewing space in the corner of the office.

I first made another jersey maxi skirt. The fabric was a Joann's clearance special, and was a perfect example of why people are afraid to sew with knits! It stretched and moved when cutting, it was full of cling that I just could seem to get rid off (I was afraid it would cling unflatteringly to my body as well, but thankfully not so!), and it pills after only only two washes! I still really like the skirt and wear it all the time. I used my modified fold-over skirt pattern, but this time made a casing for and elastic waistband instead of the fold-over waist-band.

Then I decided to tried and draft MY OWN pattern! My favorite sleeping shorts were starting to fall apart, so I finished the job and ripped out all the seams so I could trace the pieces. Using my new pattern pieces I recreated them in this fabulous purple bunny quilting cotton, with an elastic waistband and mock fly. They came out pretty good! I'm going to tweak (not to be confused with twerk...) the pattern then post them online for all of you!

Old comfy shorts.

Falling apart :(

I made a pattern!

Ta da!

So that's 2 makes... now the half. Remember that bridesmaid's dress I was making to wear in my brother's wedding on August 31st? I was using Butterick 5750 and a lovely, lightweight, emerald green, modal knit. I got it all together enough to try on and... it looked terrible on me. So just a few days before we moved into our new house I tore it all apart. I was so disappointed and overwhelmed... cause it should have looked so good and I did not have time to alter and re-sew it! Thankfully, I found a fabulous, silk J. Crew dress at a consignment store the next day. Problem solved. I was still disappointed that my dress didn't come out, but at least I looked good at the wedding and didn't have to stress myself out in the process, and the other bridesmaid loved the dress I made for her.

And that is what I made at while at Grammah's! We are now settling in our new house and my sewing room is not fully set up but functional (I'll post pics when it's all set up, because it will be fabulous!). I've been able to spend a few days sewing here already, but can't show pictures yet because it's Christmas sewing (Sorry, but expect an awesome post once presents are open in December!).


Thursday, July 18, 2013

let's take a look at a colette pattern!

My new favorite indie pattern seller, Juli of Sweet Little Chickadee, is moving to NYC! I'm very excited for her and wish her all the best! (As you know, I'll be moving in the next few weeks as well, but only a couple miles not 2,000!) In prep for her move, and just because she loves her customers so much, she had a little moving sale in which I took the opportunity to score this:

It's the "Hazel" dress pattern by Colette Patterns! I'd never ordered a Colette Pattern before, so let's check it out together. It's bound like a book with lovely stitching on the left side. The cover is card stock weight.

If you flip it over you can see the narrow flap and tab that keeps the "booklet"closed. I am a little concerned that the narrow flap and tab is not strong enough to hold everything together. It is so narrow that it doesn't seem to want to lay flat with the back cover, and I suspect will get mangled after some use, or any amount of time in my quite full pattern drawer. I did noticed that the sizing seems more consistent to ready-to-wear sizing, which may be easier for some.

Open the cover and there is great booklet with the instructions, as well as tips and a well written glossary of sewing terms. 

Colette has really put a lot of though into this booklet. Check out this super detailed drawing for the stitching the skirt to the bodice step, with all the pattern pieces labeled and everything! How many times have you sat in your sewing room with a half completed project, scratching your head over the instruction diagram from a big pattern company?

She's also sprinkled throughout the instructions these little boxes of extra explanations of sewing terms and techniques, which is very thoughtful, especially for beginners.
I cannot get this photo to go landscape! 

And lastly, the tissue pattern pieces are all tucked into a flap in the back cover.

As much as I would love to jump right into making this pattern, it will have to get tucked into a moving box for the time being, so I'll leave you with some of great versions of "Hazel" by a few of my favorite sewing bloggers! Until later!