Showing posts with label pattern. Show all posts

Sunday, April 27, 2014

work in progress: a black, silk copy-cat maxi-dress

When I stumbled upon this amazing silk, black, Sewaholic Saltspring maxi-dress by Kim at Reves Mecanique, it was lust-at-first-sight! It's a perfect summer staple yet luxurious in silk, stylish yet comfortable, casual yet sophisticated, wear it dressed it up or down... I MUST MAKE ONE!! But me? Sew with silk? That thought was terrifying.
http://revesmecanique.blogspot.nl/2013/09/silk-saltspring-maxi-dress-i-love-you.html
source: http://revesmecanique.blogspot.nl/2013/09/silk-saltspring-maxi-dress-i-love-you.html
That was six months ago. Now I'm feeling a lot more confident in my abilities, enough to risk using nicer fabrics and try new materials. So while in Boston a few weeks ago I visited this a great locally-owned shop called Grey's Fabric and Notions ("Where sewing is foxy!") and picked up some black, silk/cotton blend with just a little bit of sheen. That last part, the cotton, makes the fabric just that much less intimidating than 100% silk would be.  They also carried lots of great indie sewing patterns, and after my Cambie success, I was very tempted to pick up a copy of the Saltspring pattern for a true copy-cat, but decided instead to try a Very Easy Vogue pattern already in my stash.


I've extend the skirt pattern to maxi-length, and have sewn up a test of the bodice in a synthetic fabric from my stash. I LOVE the print of this fabric, but absolutely hate the feel of it so I was not making this as a wearable muslin.... but once I got it together it just looks so awesome! While this test isn't going to be salvageable as a wearable item of clothing (and it turns out is a size too small), I think I'm going to have to try to make something out of the remaining fabric. Maybe I can line it with a fabric that will feel much nicer against my skin.

I also plan on turning the v-neck into a scoop like my inspiration dress.  And though I'd really love to splurge on another one of Sewaholic's amazing pattern, I think this pattern-hack may work out nicely after all!

Thursday, April 3, 2014

new finished garments! and a marie jacket update

Good news! I have two finished garments to share today! First up... New Look 6251 in black polar fleece. This was made on my Singer and was almost finished when the foot lifter broke. I was able to finish with a little extra effort getting the fabric under the foot.


Exposed pocket zippers.
Not too bad on the zipper installation!


Doesn't look too bad... but again, the fit is not amazing. I should have shortened the pattern before I began, because there was not a lot of room alter at the hemline once the zippers were in. I did take in where the sleeve meets the shoulders by a good inch, and the side seams another 1/2 inch.


See what I mean? By no means terrible... but still not quite right. The proportions feel a little too top heavy. But it's a fairly quick and easy pattern, so I think I may be able do some easy alterations (shorten, take in the shoulders/upper back,  add an elastic or pull cord at the waist...) and whip up a take-2 pretty easily. That's what I should do... or I might try Kwik Sew 3813 :) Any thoughts?

Oh, and you notice the grey corduroy mini? It's a Grainline Moss Skirt! And this was my first make on my new Bernina. I sewed a size 8, and the only alteration was lengthening it a bit at the hem. It sits pretty low on the hips (which I don't have much of to being with!), so next time I'll take in the waistband just a smidge to feel a little more secure. Otherwise, a great pattern!


You can really see the extra fabric in the back and shoulders of the jacket in this picture. And there is a fold under the waistband on the hips.... maybe bring in the waistband?
I needed a little dose of spring, so I lined the pockets with a pretty spring floral cotton! And check out that beautiful understitching when putting the pockets together!

Notice the tuck under the waistband... is that because the waistband is a little to big and not staying up?


It was also only my second fly zipper installation, and if you think that it would be difficult to do... you'd be right. But after three tries I got it! I used a combination of the pattern instructions included, the Grainline Fly Insertion Tutorial, and I made-up my own methods at times when I was still scratching my head after reading both sets of instructions.


I also added a little extra topstiching here and there, like the back yoke, the waistband, and pockets.

And I almost forgot! You wanted to know what I did with the StyleARC Marie Jacket! Well, I got this pictures on my phone the other day:


My sister told me she loves it and it fits her even better than the Modcloth.com jacket I was inspired by.  Funny how that extra 7 inches tall can make such a big difference...

Oh well, I'm getting closer to a perfect fitting mid-weight jacket!


Sunday, February 16, 2014

i made pants!

Hear that?

That's the sound of me crossing off another 2014 sewing goal! I made pants! Real pants! Wear-outside-the-house pants! And they fit!
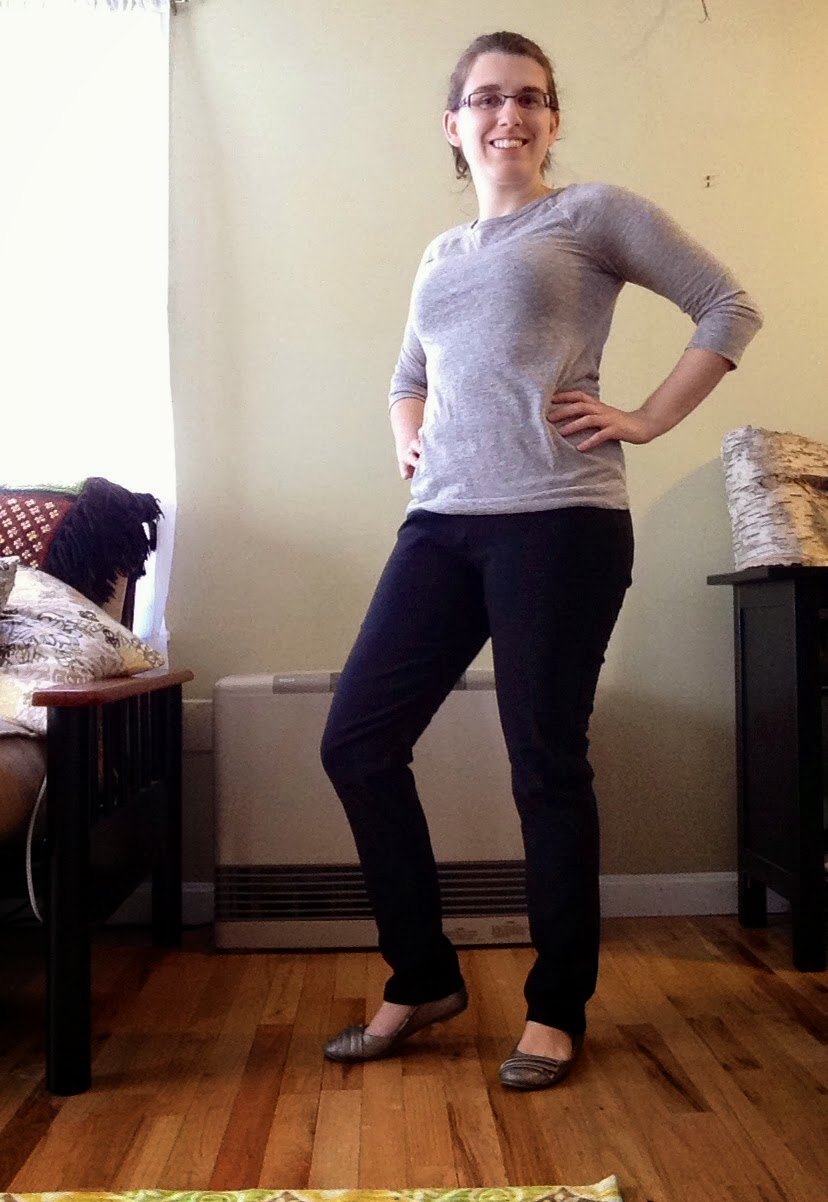
And I got a self-timer app for my new iPhone!
Per the suggestion of Gillian of Crafting a Rainbow, I used StyleARC's Elle Pants pattern. I even splurged to get a yard and a half of the suggested stretch bengaline fabric shipped over from Australia, to ensure the best possible conditions for pants-making success.


stretch bengaline fabric in black  
Gillian was right! The pants are super easy to sew up with just three pattern pieces, no fly, buttons, or pockets. Good thing too, because I found the accompanying instructions be be more than a little confusing. BUT, I will say that Chloe of StyleARC is quick and fabulous at responding to construction questions via e-mail!
She writes about Elle Pants: "This is the pant of the moment, slim line from ankle to waistline. Elastic waist 35mm or 1 ¼ inch wide. These pants sit so beautifully without any bulk, wear them with your high heels out for the night or with your sneakers for brunch.....a must have piece in your wardrobe!"

It's hard to evaluate and adjust the fit during construction, as you really can't get a feel for the fit until the waistband it on. Still, before adding the waistband I did adjust(scoop out) the crotch by about 1/4 inch, and lowered the front about 1.5 inches so that the waistband would lay perpendicular on my body, accommodating for my fuller bum. But once I had the waistband attached and I could really judge the fit, I'm not sure those adjustments were actually necessary.

After attaching the waistband I was able to narrow the legs on the outside seam by about an inch from the top of the hip all the way down. I'm very pleased with how well the legs fit, and how easy the adjustment was! I also ended up only having to shorten the pants 2.5 inches!


Something very cool and thoughtful was how StyleARC includes little care tags with their fabric to add to your finished garment, just like RTW.  No need to ruin your handmade garment because you forgot the fabric care!

Overall, I now have a great pants pattern the fits! While the instructions leave something to be desired... I enjoyed using the StyleARC pattern and will use them again (in fact, have another in the works currently!). The patterns are printed on nice, thick paper that will hold up to a lot of use, and I know if I ever have questions Chloe will respond promptly. The stretch bengaline was worth every penny. It sewed up very nicely with the right amount of weight, structure and stretch, making a great pair of stylish black pants for work! My one complaint is that they have that ever-so-slight snowpants sound when I walk. You know the sound I'm talking about...  Now that I've made a successful pair maybe I can explore some other fabric choices that would preform the same, without the little annoying "swishy" sound.


Wednesday, October 16, 2013

a three-hour dress


I had originally bought this mid-weight sweater knit fabric for... well exactly that; a sweater! But as I've been discovering more and more about my own personal style through sewing, I realized that a blue and while heart print cardigan just didn't fit into my wardrobe. When I found this image on pinterest.com, I knew exactly what that fabric needed to be:
Fall love
image from queenofoz.blogspot.com
I started with this Simplicity Sew Simple pattern I picked up for $.97, and I say started with because the end result was much different!


I made a wearable-muslin-of-sorts of this pattern straight from the envelope for my Halloween bee costume, since a costume doesn't have to bee a perfect fit. (Get it? I'm so funny!) It's a simple pullover dress, front piece cut on the fold with bust darts, back piece has two pieces with a slight flare on the back center seam. Trying that on I was able to figure out what kind of alterations I wanted to do to my paper pattern for the blue and white heart dress:


I folded up an inch between the bust and arm opening (and the same to the back pattern piece), taking care of my petite bodice and high bust-point in one swoop! Then I threw (swung? whatever the term is...) the bust dart so that in angled towards my waist for a little more waist definition. 


The original pattern came with little short sleeves, so I lengthened them to hit just as my elbow and added and little cuff/slit/I don't quite know what you call it. 

You can't quite see it, but there are two perfect back darts!
I took in a little more than an inch from the center back, which also straightened the center seam so I could cut the back on the fold and eliminate the back center seam. After stitching up the side seams I decided to add some back darts, too, for just a little more shape. I just stole those right off another dress pattern in my stash! And to finish it all off, I made facings for the neckline instead of a narrow hem or band.

It felt so good to put into practice these flat pattern altering techniques I'd picked up in places like the Sew the Perfect Fit with Lynda Maynard class I took on Craftsy.com, and the A Perfect Fit book!  I'm pretty pleased with myself! I feel a little like Carolyn from Diary of a Sewing Fanatic, who can slash and alter her TNT dress pattern into pretty much anything she can think of!

I used my sewing machine with a slight zig-zag stitch for darts, sleeve construction and setting, sewing in the neckline facings, and top-stitching on the neckline and hem, then used my serger for the side seams, finishing the armhole seams and neckline facing, and finishing the raw edge on the bottom hem so that I only had to fold up and stitch once, reducing bulk. The coolest part? From the time I started pattern alterations to finished garment took only about three hours! I got to wear it out that evening with leggings and boots... super cute. There may be more of these dresses in my future!


Sunday, September 8, 2013

sewing at grammah's

Well it's been a very busy month full of changes! We are in our new house (our first house!), my brother's wedding went off perfectly, and I'm starting on a new adventure career-wise which means this is my last week at my workplace of the last 4.5 years. Needless to say, I've been busy! BUT before I continue I'd like to say a little "thank you" to Zoe of "So, Zo... What do you know?" for her aptly timed post on Monday titled "Sorry But No More Apologies."

So... on to the SEWING!

While we were living out of boxes in my Grandparent's basement for the three weeks before we closed on the house, I was able to set up a little sewing space in the corner of my grandmother's office! I saved out a few supplies for some specific projects, and actually got 2.5 pieces made during that short
time!

My little temporary sewing space in the corner of the office.

I first made another jersey maxi skirt. The fabric was a Joann's clearance special, and was a perfect example of why people are afraid to sew with knits! It stretched and moved when cutting, it was full of cling that I just could seem to get rid off (I was afraid it would cling unflatteringly to my body as well, but thankfully not so!), and it pills after only only two washes! I still really like the skirt and wear it all the time. I used my modified fold-over skirt pattern, but this time made a casing for and elastic waistband instead of the fold-over waist-band.

Then I decided to tried and draft MY OWN pattern! My favorite sleeping shorts were starting to fall apart, so I finished the job and ripped out all the seams so I could trace the pieces. Using my new pattern pieces I recreated them in this fabulous purple bunny quilting cotton, with an elastic waistband and mock fly. They came out pretty good! I'm going to tweak (not to be confused with twerk...) the pattern then post them online for all of you!

Old comfy shorts.

Falling apart :(

I made a pattern!

Ta da!

So that's 2 makes... now the half. Remember that bridesmaid's dress I was making to wear in my brother's wedding on August 31st? I was using Butterick 5750 and a lovely, lightweight, emerald green, modal knit. I got it all together enough to try on and... it looked terrible on me. So just a few days before we moved into our new house I tore it all apart. I was so disappointed and overwhelmed... cause it should have looked so good and I did not have time to alter and re-sew it! Thankfully, I found a fabulous, silk J. Crew dress at a consignment store the next day. Problem solved. I was still disappointed that my dress didn't come out, but at least I looked good at the wedding and didn't have to stress myself out in the process, and the other bridesmaid loved the dress I made for her.

And that is what I made at while at Grammah's! We are now settling in our new house and my sewing room is not fully set up but functional (I'll post pics when it's all set up, because it will be fabulous!). I've been able to spend a few days sewing here already, but can't show pictures yet because it's Christmas sewing (Sorry, but expect an awesome post once presents are open in December!).


Thursday, July 18, 2013

let's take a look at a colette pattern!

My new favorite indie pattern seller, Juli of Sweet Little Chickadee, is moving to NYC! I'm very excited for her and wish her all the best! (As you know, I'll be moving in the next few weeks as well, but only a couple miles not 2,000!) In prep for her move, and just because she loves her customers so much, she had a little moving sale in which I took the opportunity to score this:

It's the "Hazel" dress pattern by Colette Patterns! I'd never ordered a Colette Pattern before, so let's check it out together. It's bound like a book with lovely stitching on the left side. The cover is card stock weight.

If you flip it over you can see the narrow flap and tab that keeps the "booklet"closed. I am a little concerned that the narrow flap and tab is not strong enough to hold everything together. It is so narrow that it doesn't seem to want to lay flat with the back cover, and I suspect will get mangled after some use, or any amount of time in my quite full pattern drawer. I did noticed that the sizing seems more consistent to ready-to-wear sizing, which may be easier for some.

Open the cover and there is great booklet with the instructions, as well as tips and a well written glossary of sewing terms. 

Colette has really put a lot of though into this booklet. Check out this super detailed drawing for the stitching the skirt to the bodice step, with all the pattern pieces labeled and everything! How many times have you sat in your sewing room with a half completed project, scratching your head over the instruction diagram from a big pattern company?

She's also sprinkled throughout the instructions these little boxes of extra explanations of sewing terms and techniques, which is very thoughtful, especially for beginners.
I cannot get this photo to go landscape! 

And lastly, the tissue pattern pieces are all tucked into a flap in the back cover.

As much as I would love to jump right into making this pattern, it will have to get tucked into a moving box for the time being, so I'll leave you with some of great versions of "Hazel" by a few of my favorite sewing bloggers! Until later!


Sunday, July 14, 2013

way too long!

I'm so sorry for the long pause between posts! I've noticed a couple other bloggers that I follow also have had longer-than-usually breaks between posts this summer. Summers are busy! Especially for this gal, as I've picked up another day at work for the next month+/- while a coworker had needed to take leave unexpectedly, just moved my art studio (yet to be unpacked), and WE ARE BUYING A HOUSE (but our lease is up the end of this month and we don't close on the house until August 15th so are moving TWICE in the next 49 days with our three critters and living in my grandparent's basement in between...), and I'm in my brother's wedding at the end of August which I still need to make my bridesmaid dress. WOO!

BUT on that note I do have something cool to show you! I just finished the dress for one if the other bridesmaids! This one came together very easily, in about two afternoons. I used McCalls 6353, which is now out of print but still available online.

It's an infini-dress, except unlike some of the tutorials I've seen online, this version includes a tube-top bodice underneath the wrapped pieces for extra coverage. I was not able to measure the other bridesmaid myself, and the measurements she sent me seemed a little off, so this pattern was a great choice made from knit fabric, with no fussy fittings, and lots of options to wear it. I made my version from an aqua modal jersey (which I think is like a rayon and very soft and pretty!) that I bought on eBay.


Not too bad! A tip for someone making this pattern, or a similar dress: because the wrapped ties are not hemmed, make sure to cut a very straight, clean line, like with a rotary cutter. Next up will hopefully be MY bridesmaid's dress, then a swimsuit that I've started a mock-up of, inspired by the Bombshell Swimsuit by Closet Case Files. Until later!


Sunday, June 9, 2013

keeping my promise: another summer maxi-skirt

In my last post I promised to be better about blogging my makes, after wearing 3 un-bloggged skirts during Me-Made-May. I'm keeping good on my promise, so here is one of those skirts:


I had picked up the light weight cottony fabric on a trip to Sewfisticated Discount Fabric in Dorchester, Massachusetts. I just LOVE the big bold floral print in this almost retro color palette of teal, olive and goldenrod. At first I was thinking about making Butterick 5886. It's a fabulous dress, and I was this close to cutting the pieces out, but because this print is just so cool I decided instead to make something I would wear more often. And a light breezy maxi skirt with a simple tank or t-shirt has become my summer uniform! (Although, I still plan on making this dress before the end of the summer.)

It's a simple elastic waist skirt with french seaming. At first I made it full, with something like 120 inches gathered at the waist. It looked really bad. So I hacked it below the knee, took the top half in to about 60 inches, then reconnected the full bottom half as a gathered tier or ruffle. Perfect! Well, except... do you know how when you are sewing french seams your brain thinks you are sewing the pieces backwards even when you are doing it right? This time my brain was right. I had stitched the bottom tier on inside out so the seams were on the outside. This fabric is so light, and I didn't have much wiggle room in length, so I was afraid that I would damage too much of it if I took out the seam and sewed it up again. Instead, I pressed the french seams down and added another line of stitching right along the edge of the seam, so it kind of looks like a cover stitch. Pretty clever! You would never have noticed it unless I pointed it out, would you?


Speaking of clever, I will let you know that I re-made and attached the bias strip binding to the Eucalypt Tank and this time it was perfect. I'm so pleased with myself that I'm adding bias binding to my current project as well! But that, my friends, is another post...


Friday, June 7, 2013

a (late) me-made-may '13 wrap-up and my indie creation

Sorry I'm so late for my last MMM '13 post! After my last post I wore:

  • a self-drafted black knit pencil skirt out to dinner with Mr. Sew Rachel on the evening of May 23rd. I made the skirt in April for an opening night party when visiting my sister in Lancaster, PA. (She was working at at theater in the middle of Amish country. Weird, right?) I haven't blogged it yet, but will soon, I promise!
  • my striped cardigan to work on May 27th. I love this pattern! It was a great free download from the iCandy Handmade blog. Note to self: make more of these!


  • and out with a couple girlfriend on May 30th I wore this:

Yup, that's a self-portrait of my bottom half! I finished this great self-drafted maxi skirt that same week. Again, yet to be blogged so this is a teaser!

Overall, Me-Made-May '13 was totally successful! I exceeded my pledge of wearing handmade twice a week, and found that it was actually was not hard to reach for handmade in my closet.  Overall this month wore 11 handmade garments (7 skirts, 1 dress, 1 pair lounge pants (yoga jeans), and 2 tops), wore handmade on 15 occasions, and finished 5 new items, including one for someone else! WOO HOO! Maybe for MMM '14 I'll be able to pledge a whole month of handmade! I learned that skirts are both easiest to make and to wear. I also learned that my blogging is not keeping up with my sewing! I promise to work on that, and so on that note...


TA DA! Here is my first project from my independent pattern purchases! It's Megan Nielsen's Eucalypt Tank. I love that she includes instructions for french seams right in the pattern directions.  I think this would be a great pattern for someone learning to sew. The neck and armholes are finished with self bias strips, which I had never done and was a little nervous. But the instructions were nice and clear, and look how nice they came out on the front!

The inside was another story. I found a didn't enough fabric to fold the raw edge of the bias strip under to finish, most likely due to my uneven cutting. I thought I had found a smart solution by leaving the raw edges, then covering them with a fine, fusible stay tape to prevent fraying. WRONG! The stay tape didn't stick, I had to peel it all off, and ended up with this big frayed mess:


So I was left carefully cutting all the binding off at the neck and arm openings and will start again. THIS TIME I'm using a rotary cutter for nice strait cuts and making my strips just a wee bit wider for some more wiggle room when stitching it on. Always still learning!


Friday, May 24, 2013

they're here! they're here!

My indie patterns arrived! And early! I only ordered them from Sweet Little Chickadee on May 22nd, and according to the USPS tracking they were scheduled to arrive on May 28th, but they're here!


I opened the mailing envelope to find everything beautifully packaged! Of course, I was so excited to get into the patterns that I didn't take the time to take a picture. Oh well, next time. And after this package, there will SO BE A NEXT TIME.


The patterns were wrapped in blue tissue paper and twine, and on top was her business card in a little fabric pouch with a few pieces of CANDY (which I ate.... so no pictures, either)! How nice?

This is my first experience buying independently produced patterns, so I'll show you what I found in the blue tissue. Here are my two new Sewaholic patterns:


Inside looks very much like a traditional pattern printed on tissue paper with a large folded instruction sheet. I already have fabric picked out for these!

Now I've seen a few Megan Nielsen makes on other blogs and, to be honest, haven't been overly excited about them, especially for a $20 pattern. I decided to try her new Eucalypt Tank Pattern because I had been searching for just this kind of simple tank pattern that would give me lots of options for summer staples, and a lot of sewers seam (get it?) to love her patterns. Now that I've got my hand on one, I can see why. First off, the opening of the envelope is on the long side and has a Velcro closure to make it easier to store the pattern.


And once you open it up, you find a full glossy booklet of instructions and pattern variations!


And the pattern pieces are printed on nice, heavy, white paper, something that will really hold up to being traced and used over and over again. It's so beautifully produced and packaged that I just have to make it, like immediately! Maybe I'm seeing what all the hub-bub is about!

Like I said, I will be ordering from Sweet Little Chickadee again! She had a great selection of patterns from many different designers, including Australian and UK designers like Sewaholic and Megan Nielsen, but because she's US based it means quick shipping, no international conversion credit card fees, or extra taxes for this US chick! Check them out!