Tuesday, February 18, 2014

georgia woes

I've got my pattern, got my fabric....  but no Georgia dress yet.  Per the sewalong instructions, I made a muslin of the dress bodice, and while I'm glad I did... it's been quite the ordeal! I've made FOUR versions thus far!

Three of my four bodice test-garments.

I measure in between the US size 8 and 10, so for my first test I cut a 10. I used what I assume is a quilt cotton that I got from my mom's stash, that has a small amount of 2-way stretch, similar to my sateen. Once I got it on... it was like 4 inches too big! So I cut an 8 and still too big by 2-3 inches. This seemed odd, as the finished bust measurement given for size 8 on the envelope was smaller than my actual bust measurement!

Knowing that I needed to shave off a number on inches, I cut a size 4 next. The 4 would in no way be wide enough to cover my C-cup bust (WAY too much cleavage!), so I did a a 1/2" FBA as shown in the sewalong to try to add a little more height. The sizing worked both around and in bust height... except the shape of the cup was way off! So frustrated! How could I get the bodice to be snug enough around, yet high enough to cover my bust, and still have the shape of the cup lay smoothly?!?! So I went to bed.

Today, with fresh eyes, I tried again. I made a straight size four.  (That's a finished bust measurement supposedly 2.5" less than my actual bust measurement..... makes no sense!) The cups laid nicely and the bodice was just right around. To add a little more height to the neckline, I've decided to sew the neckline with a 1/4" seam allowance instead of 5/8". I hope this will give me the coverage I'm looking for without sacrificing the fit. Now I'll have to be careful when grading out my size 4 bodice to the 8/10 waist and hips, and will probably do a test for that as well.

I signed up for this project to try to learn how to better fit for my body. To be honest, I don't feel like I've actually learned anything useful for fitting other garments in the future, except to keep trying different things until you get it right, even if what ends up right doesn't make any sense!

On a side note, don't you love that test fabric? Folded up on my fabric shelves, I would never have picked it for a garment! But once cut and sewn into a delicate fitted bodice like this, the floral really kinda shines! So I've decided to use my final test-garment for the lining of the dress, and have plenty more for something blue and floral on the outside in the future.

Sunday, February 16, 2014

i made pants!

Hear that?

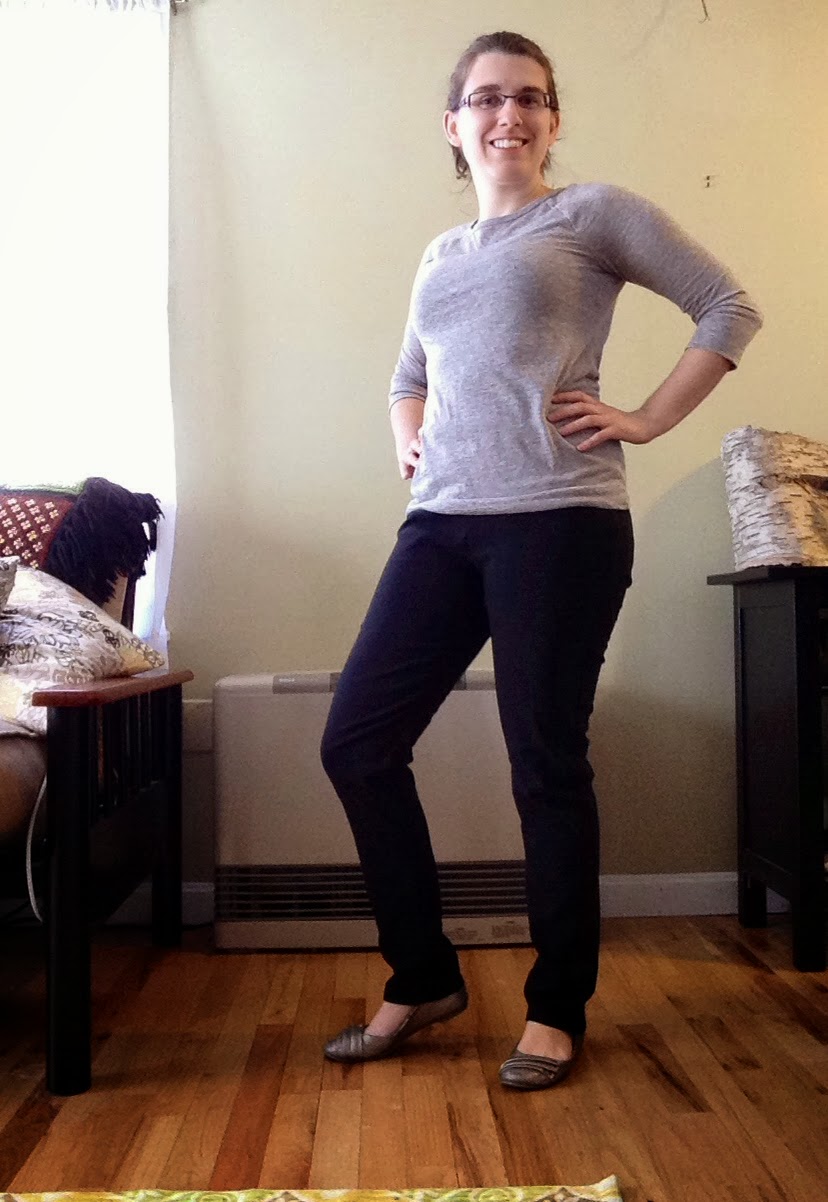
That's the sound of me crossing off another 2014 sewing goal! I made pants! Real pants! Wear-outside-the-house pants! And they fit!

And I got a self-timer app for my new iPhone!
Per the suggestion of Gillian of Crafting a Rainbow, I used StyleARC's Elle Pants pattern. I even splurged to get a yard and a half of the suggested stretch bengaline fabric shipped over from Australia, to ensure the best possible conditions for pants-making success.


stretch bengaline fabric in black  
Gillian was right! The pants are super easy to sew up with just three pattern pieces, no fly, buttons, or pockets. Good thing too, because I found the accompanying instructions be be more than a little confusing. BUT, I will say that Chloe of StyleARC is quick and fabulous at responding to construction questions via e-mail!
She writes about Elle Pants: "This is the pant of the moment, slim line from ankle to waistline. Elastic waist 35mm or 1 ¼ inch wide. These pants sit so beautifully without any bulk, wear them with your high heels out for the night or with your sneakers for brunch.....a must have piece in your wardrobe!"

It's hard to evaluate and adjust the fit during construction, as you really can't get a feel for the fit until the waistband it on. Still, before adding the waistband I did adjust(scoop out) the crotch by about 1/4 inch, and lowered the front about 1.5 inches so that the waistband would lay perpendicular on my body, accommodating for my fuller bum. But once I had the waistband attached and I could really judge the fit, I'm not sure those adjustments were actually necessary.

After attaching the waistband I was able to narrow the legs on the outside seam by about an inch from the top of the hip all the way down. I'm very pleased with how well the legs fit, and how easy the adjustment was! I also ended up only having to shorten the pants 2.5 inches!


Something very cool and thoughtful was how StyleARC includes little care tags with their fabric to add to your finished garment, just like RTW.  No need to ruin your handmade garment because you forgot the fabric care!

Overall, I now have a great pants pattern the fits! While the instructions leave something to be desired... I enjoyed using the StyleARC pattern and will use them again (in fact, have another in the works currently!). The patterns are printed on nice, thick paper that will hold up to a lot of use, and I know if I ever have questions Chloe will respond promptly. The stretch bengaline was worth every penny. It sewed up very nicely with the right amount of weight, structure and stretch, making a great pair of stylish black pants for work! My one complaint is that they have that ever-so-slight snowpants sound when I walk. You know the sound I'm talking about...  Now that I've made a successful pair maybe I can explore some other fabric choices that would preform the same, without the little annoying "swishy" sound.


Tuesday, February 11, 2014

my georgia dress fabric from mood

Between my sewing machines in for tune-ups, a new job, and a bout with influenza (yuck!), it's been a long time! I have been able to get a little bit of sewing stuff done in between all that, including deciding on my Georgia Dress fabric... and it's here!

And it's my first time buying from Mood! And they even mail you your fabric in their famous Mood bag! Some day I will go to NYC visit them in person... but I digress. Here is my Georgia Dress fabric:

Thanks for all your input! I decided to go with some mid-weight cotton/lycra sateen in black. As awesome as an amazing print dress would be, I realized that I don't actually own a LBD and thought this would be a great oppurtunity to fill that gap in my closet. But I did also order a swatch of that yellow Oscar de la Renta tribal print.


Ordering swatches?! From Mood?! I feel like such a big, grown-up, sewing blogger now! And while I am spending a little more now on higher quality fabrics, I was surprised to find some of the options really reasonable, like my sateen at $8/yard.

Also, my StyleARC patterns arrived and are in progress, so stayed tuned for a update on those projects!


Monday, January 27, 2014

georgia sewalong fabric

I'm getting excited to join in the By Hand London Georgia Dress Sewalong, but am having a hard time choosing a fabric for this form-fitting dress. I could go LBD with black sateen, or a solid red or fuchsia, or will an amazing dress really shine with an amazing print? So hard to choose! I made a Pinterest.com board here (http://www.pinterest.com/recnbm/georgia-dress-sewalong/) with some of my favorites. What are your thoughts?

http://byhandlondon.com/wp-content/uploads/2014/01/photo-2-11.jpg

Sunday, January 19, 2014

not-a-christmas-party dress


My MIL every year hosts a big annual Christmas party. It's a perfect excuse to get dressed up on a small island in Maine, and each year there are about 70 guests eating and enjoying each other's company in her home. Last year due to some kitchen construction, her Christmas party was postponed until January... and everyone loved it so much more after the holidays that now it's the annual Not-A-Christmas Party! Of course after this past year of sewing and blogging... I had to make a fabulous party dress.


The pictures were taken at the end of the party after the quests had all left, so it's probably a smidge wrinkled. I used some very cool, large scale "Yokohama Forest" quilting cotton  by Alexander Henry. The fabric was nice and thick, and both washed and pressed beautifully. Isn't is sometimes nice to sew with plain, old, cotton? Because of the large scale of the print, I spent a lot of time decided what would be the best placement of said print on my body. That also meant very careful cutting to get the pattern to line up perfectly across the seams. I ended up having to fussy-cut the sleeves from single layer from the scraps left after cutting the bodice, and was just able to lay them out so they would also match up. Totally worth it!

I used an out-of-print Butterick pattern (the number escapes me currently so I will find out when I'm back home, but something along the lines of this McCalls pattern), for a simple shift dress with back darts, french bust darts, and scoop neckline. Only three pattern pieces! Perfect for highlighting my fabric!

For adjustments I shortened the pieces just below the bust line, between the waist and hips, and then a few inches more when I did the hem. Even though I measure at a pattern size 14, I looked at the finished garment measurements and decided to cut a 10 for the shoulders, bust and waist, then grade out to a 14 in the hips (which seemed a little odd as I don't really consider myself pear shaped). By cutting the 10, the shoulders fit perfectly with no further alterations, a rare occurrence! I had to fuss with the shape of the side seams in the hips a few times to get that to lay right. It's still not quite perfect, but very close. I ended up re-drafting the whole sleeve to a straighter line for a looser fit.


On the back, I decided to try a trend and put in a gold exposed zipper! (Can you believe the retail price on that thing was almost $20! Good thing I had a nice coupon.... it was worth it.) The zipper was originally about 8" longer and ended below my bum... not cute. Traditionally I would shorten it from the bottom, but I wanted to preserve that neat finish that already came with the zipper. So I shortened from the top, tucking the end in between the lining fabric and creating a zipper-stop with superglue! (Probably not the approved technique in Vogue's New Book for Better Sewing...)

I didn't quite get the zipper perfectly straight with the neckline... but it's barely noticeable.


Notice the flecks of metallic gold and splashes of vibrant purple in the fabric!

I lined the bodice with some vibrant purple fabric from my stash that matched the purple in the cotton print. It's probably a synthetic, but has a matte sheen and weight similar to a silk blouse I own and love. Made a lovely lining! I finished the hem by hand. The sleeves were unlined and finished on the serger. Speaking of sleeves, they took forever to set in! I've been spoiled by knits that can be stretched into place. It's probably good for me to be forced to re-learn to set sleeves in woven fabric, as I'll need to know that later this year when I make my coat!


The verdict? The dress was very comfortable all evening! Even after lots of food and dessert! I also wore my Ginger high-waist panties for the first time, and they were also very comfortable! So far all my 2014 garments have been great successes and additions to my wardrobe. As an artist, this is a perfect cocktail dress for any functions or events I would be attending, and it will get a lot of use!


Friday, January 17, 2014

another indie pattern

Look what came in the mail today from my favorite indie pattern seller, Sweet Little Chickadee!


Don't you just love her packaging? Who doesn't want candy with their patterns? Sweet Little Chickadee is a great US source for all those overseas pattern designers, which means access to all those fabulous patterns without international shipping costs! So what's in my package?


It's the By Hand London Georgia Dress Pattern! I've decided to join their sewalong, in part so I can learn some much needed fitting skills. And what better to learn on than a fitted little black dress! This is my first By Hand London patter, so let's open it up a take a peek inside.


The card-stock sleeve is very sturdy. Inside there is the printed pattern tissue and a instruction booklet, which looks to have very clear and through instructions. 


The sewalong begins January 27th, so you still have time to get your pattern and join me! Check out the sewalong schedule here, grab a badge for your blog, and make sure to show me your Georgia Dress when it's finished! 


Sunday, January 12, 2014

top 5 of 2013 - part 4: inspirations

Top 5 of 2013 - An Annual Blog Series

1.) Sewing Bloggers

Before starting this sewing blog in the dawn for 2013, I had been discovering and reading sewing blogs from all over the world. They were what inspired me to start this blog about my sewing adventures. Since then I've discovered even more fabulous bloggers, and even gotten to correspond with some through blog comments! Could even image my excitement the first time I had an established sewing blogger comment on MY blog?!?! That means she READ MY BLOG!

I'm especially inspired by bloggers who demonstrate amazing construction, fitting and tailoring techniques, like Diary of a Sewing Fanatic, Sew Me Loveand Male Pattern Boldness. I aspire one day to have that level of skill and sewing patience.  I also love see bloggers who are so confident in their personal style, like Tilly and the Buttons, Oonaballona, and Scruffy Badger Time. 2013 has been for me not only about developing as a sewist, but also developing my personal style. 

This is only a handful of the bloggers who've inspired me this year, and that list is growing all the time!

2.) Readers 

That's YOU! In 2013 I went from 0 to 7966 page views! HOW COOL IS THAT!?!? Every time I get a new comment, or 25 views on my latest post, I am more inspired to create and share. And I love seeing my little blogger map light up with readers from all different countries. It's so cool to be part of this bigger web for sewists from all over the world!

3.) My Mom (awwww....)

No really. She sewed all our clothes when we were little, even bathing suits! And she's the one who taught me to sew, and saved my butt every time I bit off a bigger project that I could chew.  This year I've realized just how much I still had to learn, and have strived to learn how to not only make clothes but really well constructed garments. It's made me realize exactly where my skill level is and how to chose project that are appropriate for it, as she's not always here to fill in those gaps. (Although I have taken a project to her, or called for an over-the-phone-how-to, and she gave me her sewing machine and old serger....) I think I've come pretty far and am totally gonna make her proud in 2014!

4.) My Sister (this is really getting mushy now!)

As I've mentioned before, she and I have the same measurements, only her's are on a 5'7" frame! That means when something doesn't fit me right... I know it'll look stunning on her. Looking ahead to 2014 I've got some pretty fabulous projects planned for her. She has a style and lifestyle very different than mine and it's really fun being able to sew for her things that wouldn't work for me. Add in my sister-in-law and I've got three totally different styles to inspire me and to play with, and that's pretty cool!

While this one fit me OK, can your guess who it looked killer on?
I'm so proud of this top I made from my sister-in-law.
5.) Me (bear with me for a minute because this isn't some narcissistic thing...)

There have been a lot of changes for me this past year, and some have been harder internally than others. Sewing you own clothing is a really beautiful form of self-love. (First of all, you have no choice but to come to terms with that fact that your waist measurement is in fact now that much bigger.) But seriously, why spend all that time on one garment unless you think you are worth it? And spending all this time and creativity in crafting your own style and how you present yourself to the world, sometimes that's therapy right there. There have been times this year I really needed that. And it's going to make me that much of a better person in  2014.