Showing posts with label review. Show all posts

Thursday, April 3, 2014

new finished garments! and a marie jacket update

Good news! I have two finished garments to share today! First up... New Look 6251 in black polar fleece. This was made on my Singer and was almost finished when the foot lifter broke. I was able to finish with a little extra effort getting the fabric under the foot.


Exposed pocket zippers.
Not too bad on the zipper installation!


Doesn't look too bad... but again, the fit is not amazing. I should have shortened the pattern before I began, because there was not a lot of room alter at the hemline once the zippers were in. I did take in where the sleeve meets the shoulders by a good inch, and the side seams another 1/2 inch.


See what I mean? By no means terrible... but still not quite right. The proportions feel a little too top heavy. But it's a fairly quick and easy pattern, so I think I may be able do some easy alterations (shorten, take in the shoulders/upper back,  add an elastic or pull cord at the waist...) and whip up a take-2 pretty easily. That's what I should do... or I might try Kwik Sew 3813 :) Any thoughts?

Oh, and you notice the grey corduroy mini? It's a Grainline Moss Skirt! And this was my first make on my new Bernina. I sewed a size 8, and the only alteration was lengthening it a bit at the hem. It sits pretty low on the hips (which I don't have much of to being with!), so next time I'll take in the waistband just a smidge to feel a little more secure. Otherwise, a great pattern!


You can really see the extra fabric in the back and shoulders of the jacket in this picture. And there is a fold under the waistband on the hips.... maybe bring in the waistband?
I needed a little dose of spring, so I lined the pockets with a pretty spring floral cotton! And check out that beautiful understitching when putting the pockets together!

Notice the tuck under the waistband... is that because the waistband is a little to big and not staying up?


It was also only my second fly zipper installation, and if you think that it would be difficult to do... you'd be right. But after three tries I got it! I used a combination of the pattern instructions included, the Grainline Fly Insertion Tutorial, and I made-up my own methods at times when I was still scratching my head after reading both sets of instructions.


I also added a little extra topstiching here and there, like the back yoke, the waistband, and pockets.

And I almost forgot! You wanted to know what I did with the StyleARC Marie Jacket! Well, I got this pictures on my phone the other day:


My sister told me she loves it and it fits her even better than the Modcloth.com jacket I was inspired by.  Funny how that extra 7 inches tall can make such a big difference...

Oh well, I'm getting closer to a perfect fitting mid-weight jacket!


Sunday, March 16, 2014

a stylearc marie jacket

I'd hinted a few posts back that I had another StyleARC pattern in the works, and here it is! The Marie Jacket! I still need to hem the sleeves but wanted to show your right away.

Looks like I installed my zipper on the wrong side... oh well!

http://www.stylearc.com.au/stylearc/images/2013/MARIE-JACKET.jpg
source: http://www.stylearc.com.au/stylearc/index.php?page=shop.product_details&product_id=523&option=com_virtuemart&Itemid=47


Other bloggers have also noticed that the jacket has much more of a hi-low hem that the illustration suggests, and it's very long.  More on that later...

I used a really lovely, fairly thick, heathered charcoal grey knit from Joann Fabrics. I love this fabric! It has a metallic thread throughout, and washed, cut and sewed beautifully. The pattern calls for a snap to hold up the cowl when zipped, but I decided to try a magnetic clasp originally sold for handbags. It's a little heavier, but I think a fun detail. I was inspired by the same closure in my sister's Modcloth Jacket... in fact her jacket inspired the whole make!


I love the back seaming. I could see it done with an insteresting contrast... leather shoulder detail maybe?
Could use a little more back shaping... and sooooo long!  
When first constructed it was too big overall, so I re-set each sleeve taking out 1 1/4", took in just shy on an inch on each side seam and 1/4" in the sleeves. Still, after all that work it just wasn't very flattering.

Apparently my body no longer has a shape... well, I guess a pudgy rectangle is shape.

One, it's really long. That's not a surprise for me. The hi-low hits unflattering in the front, and completely covers my butt, and not in a cute show-it-off way. The cowl ended up bulky, with four layers when zipped of that nice, thick jersey. Even after taking things in, it doesn't fit snugly on my shoulders or waist, instead choosing to enphasize that pudgy ring between my bellybutton and lack-of-hips all the way around. (Yes, I am implying that my jacket has a mind of it's own and is choosing to hug my unflattering bits...) And maybe it's just overall too much fabric for my small frame. So I see two options, send it to my sister (same measurments, but 7" taller and a great hoursglass shape), or shorten to a bomber-style length. At that length, I would be cutting it off above the area it unflatteringly hugs, the rest of the jacket having about the same amount of ease. 

Sorry the picture it so dark! I've tucked the hem under to my hip level, where my hands are. I should have work lighter jeans!
So what should I do? Send the longer hi-low version to my sister, or alter it to a shorter bomber jacket?


Sunday, February 16, 2014

i made pants!

Hear that?

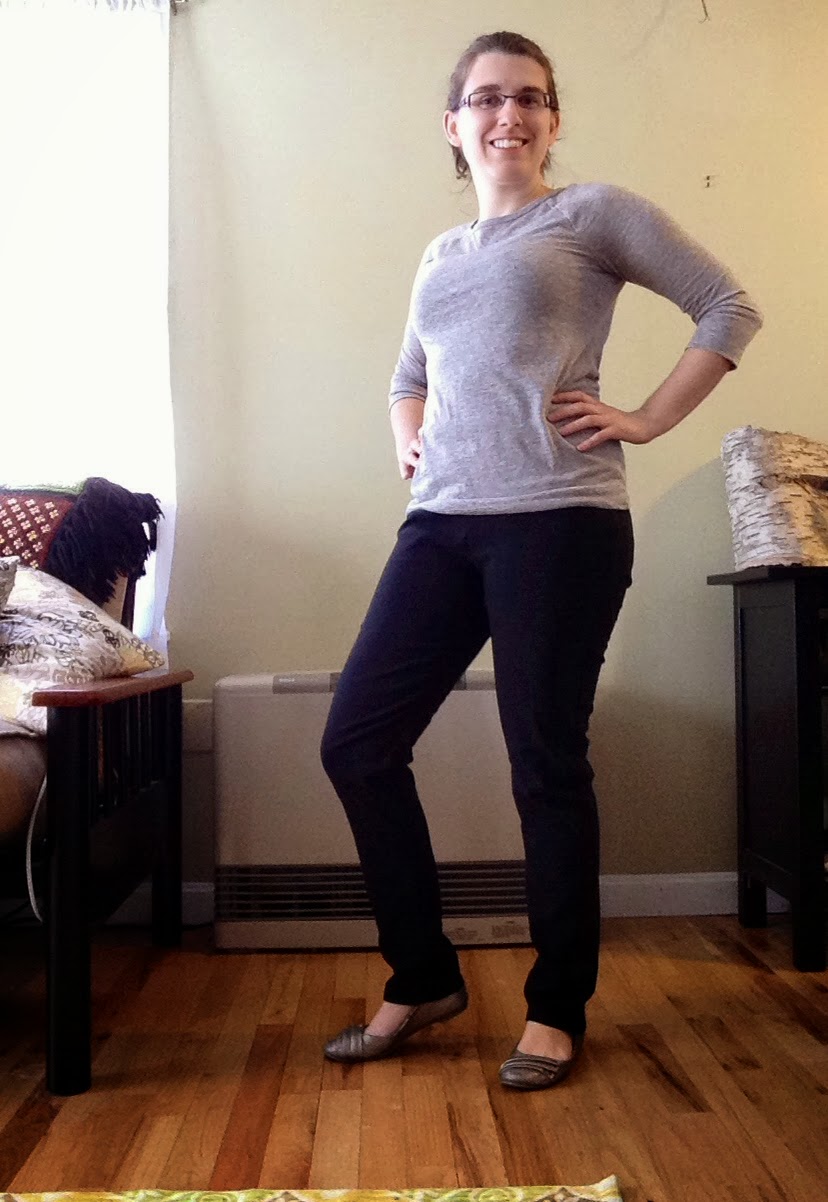
That's the sound of me crossing off another 2014 sewing goal! I made pants! Real pants! Wear-outside-the-house pants! And they fit!

And I got a self-timer app for my new iPhone!
Per the suggestion of Gillian of Crafting a Rainbow, I used StyleARC's Elle Pants pattern. I even splurged to get a yard and a half of the suggested stretch bengaline fabric shipped over from Australia, to ensure the best possible conditions for pants-making success.


stretch bengaline fabric in black  
Gillian was right! The pants are super easy to sew up with just three pattern pieces, no fly, buttons, or pockets. Good thing too, because I found the accompanying instructions be be more than a little confusing. BUT, I will say that Chloe of StyleARC is quick and fabulous at responding to construction questions via e-mail!
She writes about Elle Pants: "This is the pant of the moment, slim line from ankle to waistline. Elastic waist 35mm or 1 ¼ inch wide. These pants sit so beautifully without any bulk, wear them with your high heels out for the night or with your sneakers for brunch.....a must have piece in your wardrobe!"

It's hard to evaluate and adjust the fit during construction, as you really can't get a feel for the fit until the waistband it on. Still, before adding the waistband I did adjust(scoop out) the crotch by about 1/4 inch, and lowered the front about 1.5 inches so that the waistband would lay perpendicular on my body, accommodating for my fuller bum. But once I had the waistband attached and I could really judge the fit, I'm not sure those adjustments were actually necessary.

After attaching the waistband I was able to narrow the legs on the outside seam by about an inch from the top of the hip all the way down. I'm very pleased with how well the legs fit, and how easy the adjustment was! I also ended up only having to shorten the pants 2.5 inches!


Something very cool and thoughtful was how StyleARC includes little care tags with their fabric to add to your finished garment, just like RTW.  No need to ruin your handmade garment because you forgot the fabric care!

Overall, I now have a great pants pattern the fits! While the instructions leave something to be desired... I enjoyed using the StyleARC pattern and will use them again (in fact, have another in the works currently!). The patterns are printed on nice, thick paper that will hold up to a lot of use, and I know if I ever have questions Chloe will respond promptly. The stretch bengaline was worth every penny. It sewed up very nicely with the right amount of weight, structure and stretch, making a great pair of stylish black pants for work! My one complaint is that they have that ever-so-slight snowpants sound when I walk. You know the sound I'm talking about...  Now that I've made a successful pair maybe I can explore some other fabric choices that would preform the same, without the little annoying "swishy" sound.


Sunday, January 5, 2014

first make of 2014 - lola dress by victory patterns

I know I haven't finished my Top 5's of 2013... but didn't want to wait to show you my first sewing project of the new year, Victory Patterns Lola dress!

I had picked up some medium-weight, heather grey sweatshirt fabric at a surplus/salvage store for something around $3/yard. Looking at the opposite side, I suspect it's some kind of performance fabric. It washed great, and I still have 1 1/2 or so for another project! I also had plenty of matching grey ribbing in my stash from a Fabric.com sale.


The Lola pattern is a casual sweatshirt dress, with princess seaming, raglan sleeves and a hi-lo waistline that's actually quite flattering. Makes for a dress that's super cozy without being frumpy. I purchased the PDF version, which meant taping all those pages together before cutting the pattern out. That part took more time that the whole dress construction! (Or at least it seemed like it!) I made a size 8 with no alterations and it fit great, although I did accidentally loose some length at the waist because I sewed the skirt on backwards and had to cut and re-sew.... oops! 

Everything was constructed on the serger, aside from the little triangle at the neckline and the top hem of the pockets. My seams came out a little wobbly as I'm still learning my serger, but for a sweatshirt dress like this no one will notice! The pattern includes notches to line up along the princess seams and other curved seams, which I thought was a great benefit for easing those curves.

I love the raglan sleeves and princess seaming... so flattering!


I would totally recommend this pattern, and hope to make it again. And looking ahead to my  new year sewing plans, it seems that 2014 is going to be the year of the indie patterns!

How about a iPad selfie to end the post? Until later!


Thursday, July 18, 2013

let's take a look at a colette pattern!

My new favorite indie pattern seller, Juli of Sweet Little Chickadee, is moving to NYC! I'm very excited for her and wish her all the best! (As you know, I'll be moving in the next few weeks as well, but only a couple miles not 2,000!) In prep for her move, and just because she loves her customers so much, she had a little moving sale in which I took the opportunity to score this:

It's the "Hazel" dress pattern by Colette Patterns! I'd never ordered a Colette Pattern before, so let's check it out together. It's bound like a book with lovely stitching on the left side. The cover is card stock weight.

If you flip it over you can see the narrow flap and tab that keeps the "booklet"closed. I am a little concerned that the narrow flap and tab is not strong enough to hold everything together. It is so narrow that it doesn't seem to want to lay flat with the back cover, and I suspect will get mangled after some use, or any amount of time in my quite full pattern drawer. I did noticed that the sizing seems more consistent to ready-to-wear sizing, which may be easier for some.

Open the cover and there is great booklet with the instructions, as well as tips and a well written glossary of sewing terms. 

Colette has really put a lot of though into this booklet. Check out this super detailed drawing for the stitching the skirt to the bodice step, with all the pattern pieces labeled and everything! How many times have you sat in your sewing room with a half completed project, scratching your head over the instruction diagram from a big pattern company?

She's also sprinkled throughout the instructions these little boxes of extra explanations of sewing terms and techniques, which is very thoughtful, especially for beginners.
I cannot get this photo to go landscape! 

And lastly, the tissue pattern pieces are all tucked into a flap in the back cover.

As much as I would love to jump right into making this pattern, it will have to get tucked into a moving box for the time being, so I'll leave you with some of great versions of "Hazel" by a few of my favorite sewing bloggers! Until later!


Sunday, July 14, 2013

way too long!

I'm so sorry for the long pause between posts! I've noticed a couple other bloggers that I follow also have had longer-than-usually breaks between posts this summer. Summers are busy! Especially for this gal, as I've picked up another day at work for the next month+/- while a coworker had needed to take leave unexpectedly, just moved my art studio (yet to be unpacked), and WE ARE BUYING A HOUSE (but our lease is up the end of this month and we don't close on the house until August 15th so are moving TWICE in the next 49 days with our three critters and living in my grandparent's basement in between...), and I'm in my brother's wedding at the end of August which I still need to make my bridesmaid dress. WOO!

BUT on that note I do have something cool to show you! I just finished the dress for one if the other bridesmaids! This one came together very easily, in about two afternoons. I used McCalls 6353, which is now out of print but still available online.

It's an infini-dress, except unlike some of the tutorials I've seen online, this version includes a tube-top bodice underneath the wrapped pieces for extra coverage. I was not able to measure the other bridesmaid myself, and the measurements she sent me seemed a little off, so this pattern was a great choice made from knit fabric, with no fussy fittings, and lots of options to wear it. I made my version from an aqua modal jersey (which I think is like a rayon and very soft and pretty!) that I bought on eBay.


Not too bad! A tip for someone making this pattern, or a similar dress: because the wrapped ties are not hemmed, make sure to cut a very straight, clean line, like with a rotary cutter. Next up will hopefully be MY bridesmaid's dress, then a swimsuit that I've started a mock-up of, inspired by the Bombshell Swimsuit by Closet Case Files. Until later!


Thursday, May 16, 2013

a bright casual mccalls 6751 for summer

I saw this fabric and knew I needed it! The colors, the print, the softness, the drape! The questions was, what to make? Mr. Sew Rachel thought I should make a maxi-skirt, and while I do love my maxi-skirts, I really wanted a top. But, with a large print like this it had to be a pattern without a lot of pieces and seams, and large enough to really show the print off without overwhelming my small frame. I decided to try a new McCalls pattern, M6751 view D.


It's not that l'm crazy for the butt flap trend this season, but it needed a little something to avoid being just a boxy top. After looking at the finished garment measurements I decided to cut a size smaller. 6+ extra inches in the bust? That's too loose for me. Even so, the shoulder straps lay a little too wide, which I'm finding is the case with most patterns on my frame.
M6751
Back view D
Back view of my finished top.
The back is designed to be made from one pattern piece, cutting two so they mirror each other. I thought, "how silly to waste such beautiful fabric by having a double layer over the butt flap. It isn't even seen!" So I cut the bottom piece to just under where they overlap, and then had enough scrap for a cool infinity scarf! Wrong move. Once I had it on, the way the "V" in the back draped revealed the bottom edge of the under-layer, and a big ugly opening! I had to top stitch the two pieces together along the top hemline about 6 inches from the side seam to prevent the gaping. It's mostly invisible, but now the back "V" doesn't drape nearly so lovely. What did I learn? Next time follow the instructions because they are probably that way for a reason.


Speaking of instructions, I discovered a fabulous little nugget of information tucked in the M6751 instructions! The options for finishing the neckline, armholes, and hem were bias tape or a narrow hem. I wasn't so pleased with bias tape when I used it for the top I made for my sister, so I thought I try my hand at a narrow hem and discovered THIS:


Why had I not seen this before?!?! What a great way to ease in a curved hemline, and even with the straight hems that extra line of stitching made for a great guild-line! Remember how in the last post I stated how much I hate hemming? Well I still think it's tedious and fussy, but at least I now have a tool that makes it a little easier and lead to better results! 

Sunday, May 12, 2013

butterick 5885 finished!

I finally finished the Butterick 5885 by Maggy London that I started over a month ago! I actually had the construction finished a long time ago but have been putting off the hem. Why? I don't like hemming, for one thing. It's tedious and fussy and plain old not as much fun as the making-something-out-of-just-fabric part (a.k.a. construction). If you don't get the hem just right the whole garment, and all the work up until then, will look awful. Most of the UFOs in my sewing room are because I just don't feel like hemming them. This dress with a full circle skirt has A LOT of hem, and a fussy curved hem at that!

Second, it's so hard to mark a hem by yourself! Most of the time I can wing it when I have a straight hem, or one that hangs evenly right from the pattern. But this big circle skirt in a stretchy knit made for an all wonky hem. I tried the hem attachments on my dress form, but once I was marked all the way around, my marks were 2 inches shorter then when they started... that's not going to work. I tried to teach Mr. Sew Rachel how to do it, but a quarter of the way through he throws up his hands and says "I can't do this! I'm going to ruin your pretty dress!" Umm, I was going check it in the mirror before I cut anything.... oh well. So I took it to my Gramma's.  Of course she had no problem helping me out, and I now I know to go to her first.

Once the dress was marked, it actually finished up quite nicely! This fabric has been great to work with; even easing the curve of the hem was no trouble at all! And for the 56 inches of elastic that pattern was telling me to put in the waist.... I just left it out and it looks just fine. In fact, the fit is fabulous. I would for sure make this pattern again!


A v-neck with crisscrossed and ruched detail. As usual  I had to take in in the shoulders a couple inches, as well as take in the sides. I always cut a 14 (which is what a measure at) and always take it in! I need to just cut a 12 for all patterns from now on...

The back is constructed from two one-shoulder pieces that cross and then both attach at the waist for a nice v-detail. I love how the graphic print will camouflage any little bumps in both in the dress construction and in the wearer!